目标
我的常规操作,开搞之前先定个小目标: 文件/数据备份 (包括手机相册/学习资料等)、 浏览学习资料 (操作一定要简单/方便)。先做到基础功能,欲望功能会随着不断熟悉而定😄。
准备
- 一个U盘,USB3.0/4G-16GB, 我没有3.0的,用的是2.0的
- 老笔记本一台,退役
ThinkPadX250,500G的硬盘练手,等弄好后根据自己情况把硬盘升级到2T,后续有需求再外接
- 其他电脑一台,安装写盘工具 Etcher 软件
- 网线1根,感谢公司给我提供一根解燃眉之急
功课
https://www.sohu.com/a/553078949_120111001
https://nga.178.com/read.php?tid=38650456&rand=207
https://www.cnblogs.com/yixiaocn/p/18155753
经过
Day1: 2024-09-19
18号下班,发现没有网线,19号找公司行政借了一根,晚上下班搞起来。根据这篇大佬的笔记去操作的! 我的老旧笔记本安装(升级)黑群晖 7.1 ,做完后我发现最新的系统是7.2,有的套件说要用7.2的系统。准备重装,参考 黑群晖NAS7.2.1安装教程
Day2: 2024-09-20
流程和上面参考的文章不太一样,我下载的引导rr-24.9.1。
Day3: 2024-09-21
昨天晚上安装完7.2就睡觉了,今天周六准备拆机看看内部结构,顺便清清灰。果然,打开后收获不少。
https://www.jb51.net/softjc/354972.html


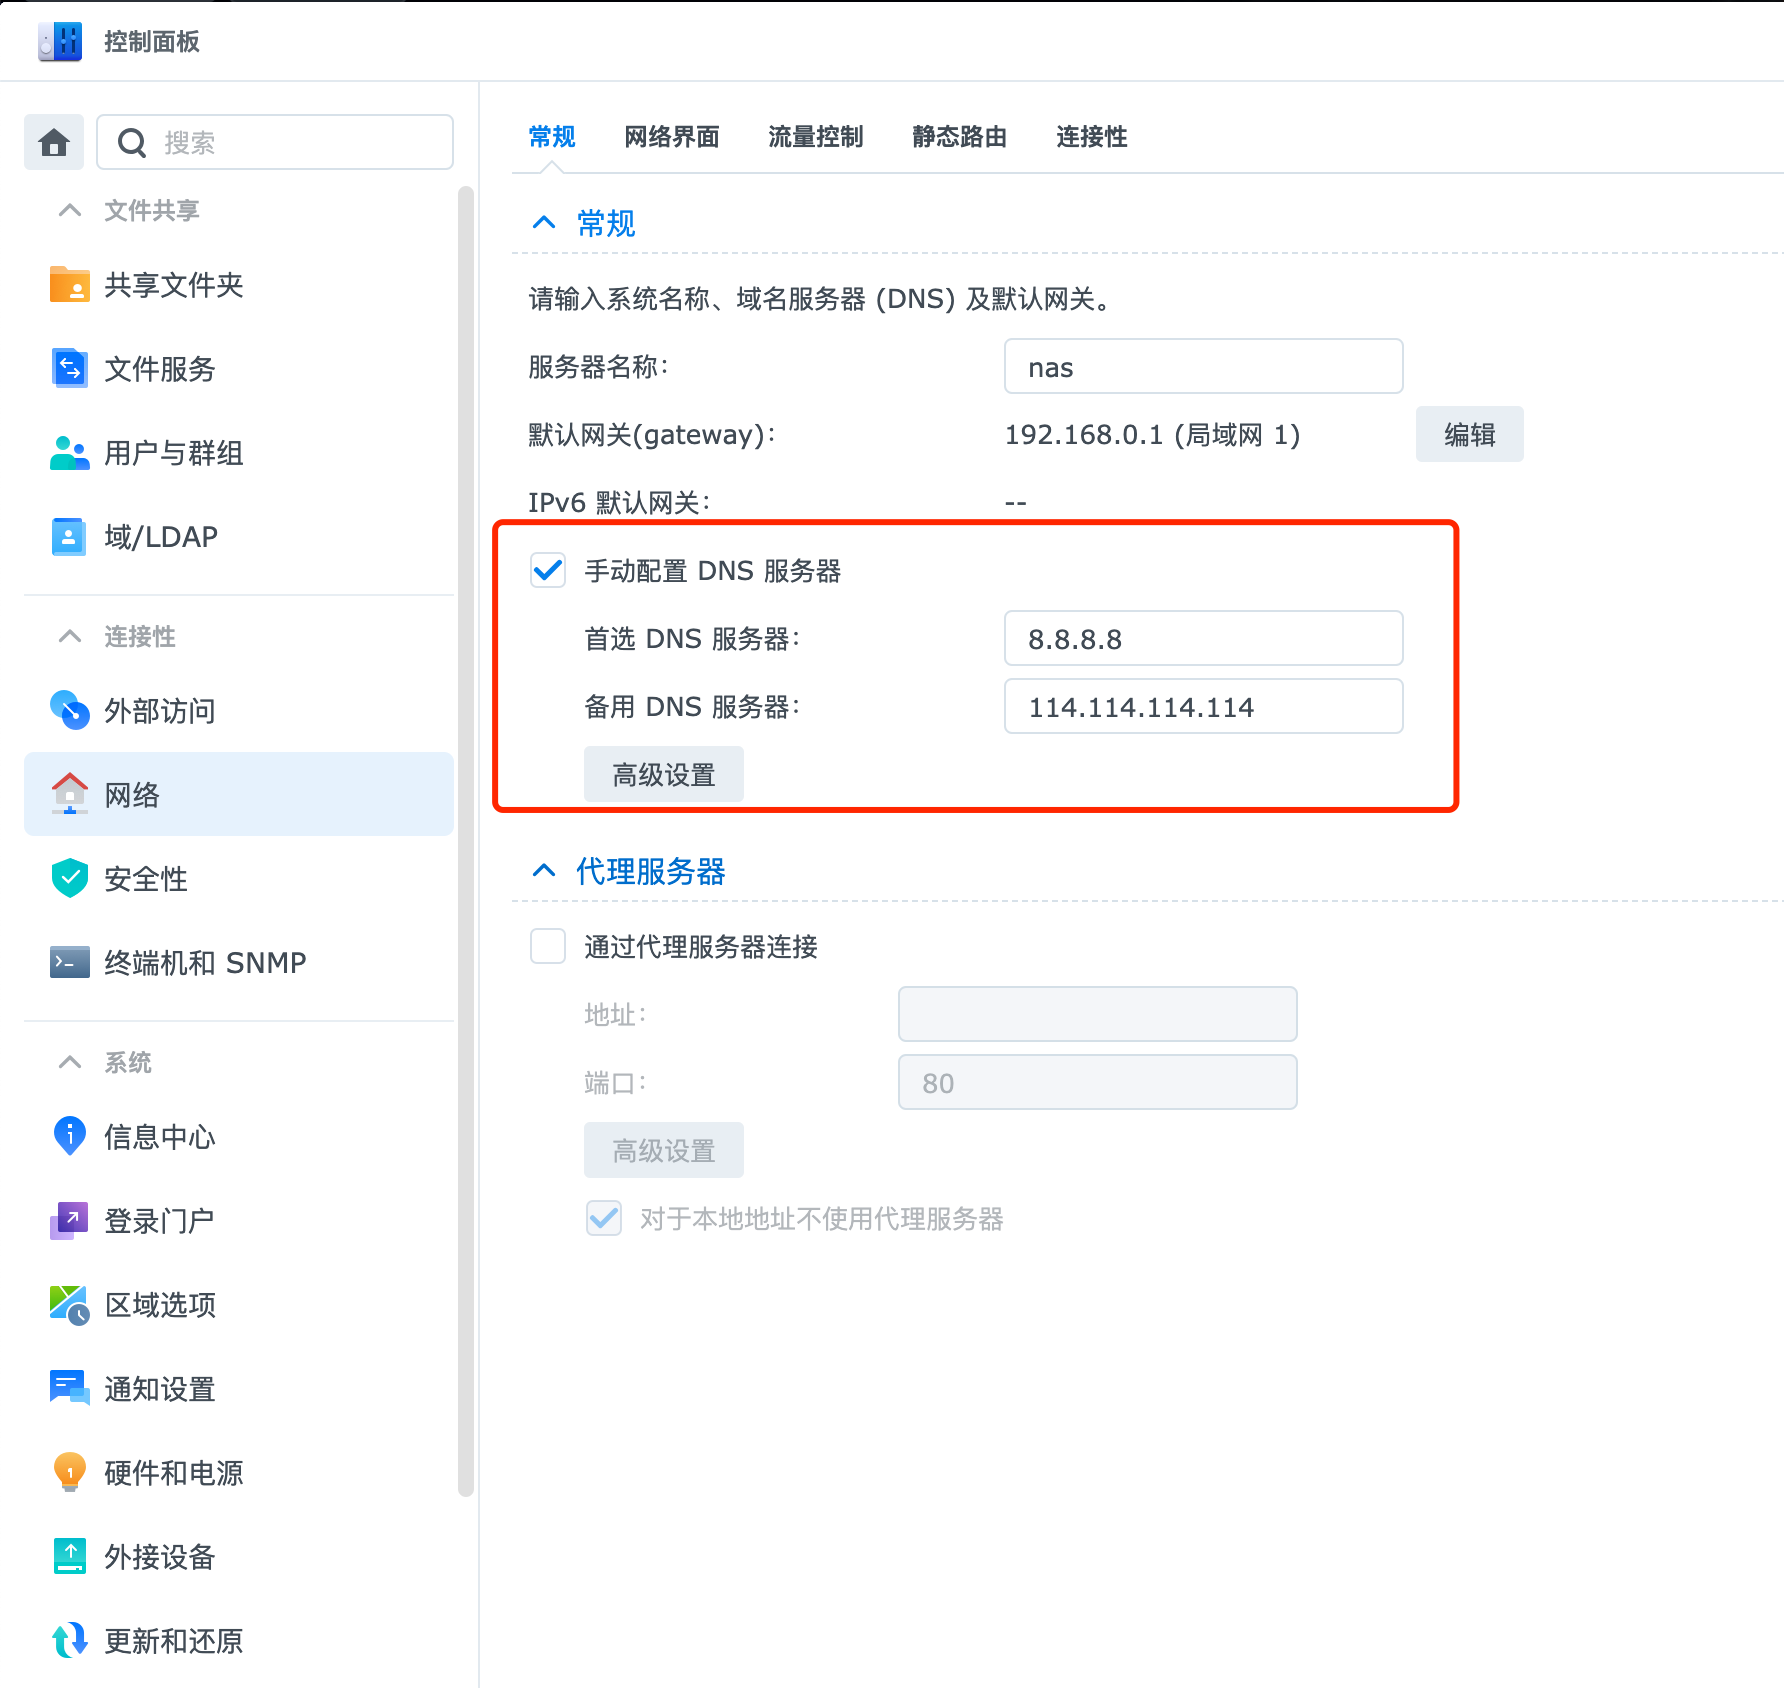
开始安装小雅全家桶, 9月21号应该是已经寄了 (连不上阿里云盘api),9 月底在本机、服务器都成功部署了小雅,同样的都是Docker环境,所以小雅没问题 ,应该是其中某个环节出问题了。最后排查问题发现docker pull不下来镜像,是DNS导致的,打开群辉网络一看果然DNS是 192.168.0.1,修改为8.8.8.8和114.114.114.114,重新运行安装小雅成功。


 1
 2
 3
 4
 5
 6
 7
 8
 9
10
|
# 7.2系统:在群辉系统编辑,在Service下添加下面三行代码,ip换成自己局域网内已科学上网的IP+端口,开启局域网访问
#<span style="color: rgba(212, 76, 71, 1);">按自己需要再设置即可</span>vim /usr/local/lib/systemd/system/pkg-ContainerManager-dockerd.service

[Service]
Environment="HTTP_PROXY=http://192.168.0.15:7890"
Environment="HTTPS_PROXY=http://192.168.0.15:7890"
Environment="NO_PROXY=localhost,127.0.0.0/8,192.168.0.0/16,172.16.0.0/12,10.0.0.0/8"

# 重启群辉docker
sudo synosystemctl restart pkgctl-ContainerManager
|
小雅alist+emby docker-compose.yml安装
 1
 2
 3
 4
 5
 6
 7
 8
 9
10
11
12
13
14
15
16
17
18
19
20
21
22
23
24
25
26
27
28
29
30
31
32
33
34
35
36
37
38
39
40
41
42
43
44
45
46
47
48
49
50
51
52
53
54
55
56
57
58
59
60
61
62
63
64
65
|
# ssh进入群辉docker小雅对应目录
# 参考:https://github.com/monlor/docker-xiaoya?tab=readme-ov-file#%E4%BD%BF%E7%94%A8docker-compose
# vim docker-compose.yml
version: "3"
services:
 alist:
   image: ghcr.io/monlor/xiaoya-alist:latest
   volumes:
     - /volume1/docker/xiaoya:/data
   ports:
     - "5678:5678"
     - "2345:2345"
     - "2346:2346"
   env_file:
     - env
   restart: unless-stopped
   networks:
     - default
 metadata:
   image: ghcr.io/monlor/xiaoya-metadata:latest
   env_file:
     - env
   volumes:
     - /volume1/docker/xiaoya:/etc/xiaoya
     - /volume1/docker/xiaoya/media:/media/xiaoya
     - /volume1/docker/xiaoya/config:/media/config
     - /volume1/docker/xiaoya/cache:/media/config/cache
     - /volume1/docker/xiaoya/meta:/media/temp
   depends_on:
     - alist
   restart: unless-stopped
   networks:
     - default
 emby:
   image: ghcr.io/monlor/xiaoya-embyserver:latest
   env_file:
     - env
   depends_on:
     - metadata
     - alist
   volumes:
     - /volume1/docker/xiaoya/media:/media
     - /volume1/docker/xiaoya/config:/config
     - /volume1/docker/xiaoya/cache:/cache
   ports:
     - "6908:6908"
   restart: unless-stopped
   networks:
     - default

networks:
 default:

volumes:
 xiaoya:
 media:
 config:
 meta:
 cache:


# env 文件下载后,根据文字描述写入自己的
# 最后运行<span style="color: rgba(212, 76, 71, 1);"> **docker-compose up -d

等待安装完成...** </span>
|
如果后续需要新增Pikpak、夸克和115等网盘,修改env文件后运行如何命令即可
1
|
docker-compose up -d alist
|
Day4:2024-09-23
经过小雅Alist失败后,决定还是按照自己喜好来,直接安装jellyfin,视频库自己选喜好的下载。
参考下面文章安装Jellyfin,我是用的docker安装的。
https://blog.aliluya.com/archives/RFlJHODr
安装完Jellyfin,就可以愉快的下载电影了。硬件加速和刮削搜下教程,问题不大。下一步开始把宋心之的英语听力放进去,再下一些纪录片、动画片、电影、电视机来补充媒体库。
Day5:2024-09-25
今天晚上下班取回快递,测了下功率大概10瓦。等服务都正常了,再看看功率。安装qbittorrent 参考官网、参考官网、参考官网 (我折腾了一晚上,还是没有下载速度,决定整理适合自己的笔记)
https://github.com/linuxserver/docker-qbittorrent
 1
 2
 3
 4
 5
 6
 7
 8
 9
10
11
12
13
14
15
16
17
18
19
20
21
22
23
24
25
26
27
28
29
30
31
32
33
34
35
36
37
38
39
40
41
42
43
44
45
46
47
48
49
50
51
52
53
54
55
56
57
58
59
60
61
62
63
64
65
66
67
68
69
70
71
72
73
74
75
76
77
78
79
80
81
82
83
84
|
# docker-compose.yml
version: "3"
services:
 qbittorrent:
   image: lscr.io/linuxserver/qbittorrent:latest
   container_name: qbittorrent
   environment:
     - PUID=501
     - PGID=20
     - TZ=Asia/Shanghai
     - WEBUI_PORT=8099
     - TORRENTING_PORT=51000
   volumes:
     - /Users/qijian.song/qb/config:/config
     - /Users/qijian.song/qb/downloads:/downloads
   ports:
     - 8099:8099
     - 51000:51000
     - 51000:51000/udp
   restart: unless-stopped

# 开始构建
(base) ➜  qb docker-compose up -d
[+] Running 10/10
✔ qbittorrent 9 layers [⣿⣿⣿⣿⣿⣿⣿⣿⣿]      0B/0B      Pulled                                                                                                                             59.0s
  ✔ 8b4119973585 Pull complete                                                                                                                                                         5.8s
  ✔ df25a931801a Pull complete                                                                                                                                                         1.6s
  ✔ 511ddc6bc988 Pull complete                                                                                                                                                         1.8s
  ✔ 6f9adabf95e8 Pull complete                                                                                                                                                         3.4s
  ✔ 49be30f85e58 Pull complete                                                                                                                                                        14.8s
  ✔ f1ac46295585 Pull complete                                                                                                                                                         5.2s
  ✔ 87cd5dd08df3 Pull complete                                                                                                                                                        52.6s
  ✔ af957c279dc2 Pull complete                                                                                                                                                        11.1s
  ✔ 6b7247c616fb Pull complete                                                                                                                                                        15.6s
[+] Running 2/2
✔ Network qb_default     Created                                                                                                                                                       0.0s
✔ Container qbittorrent  Started                                                                                                                                                       0.2s
(base) ➜  qb ls
config             docker-compose.yml downloads
(base) ➜  qb docker logs
(base) ➜  qb docker ps
CONTAINER ID   IMAGE                                    COMMAND                   CREATED         STATUS         PORTS                                                                                                      NAMES
1028fe35cc29   lscr.io/linuxserver/qbittorrent:latest   "/init"                   2 minutes ago   Up 2 minutes   6881/tcp, 0.0.0.0:8099->8099/tcp, 8080/tcp, 6881/udp, 0.0.0.0:51000->51000/tcp, 0.0.0.0:51000->51000/udp   qbittorrent
9a58be5b1fe3   minio/minio                              "/usr/bin/docker-ent…"   2 months ago    Up 2 weeks     9000/tcp, 0.0.0.0:9098-9099->9098-9099/tcp                                                                 minio                                                                         php
(base) ➜  qb docker logs 1028fe35cc29 #<span style="color: rgba(212, 76, 71, 1);">在日志中查看用户名密码</span>[migrations] started
[migrations] no migrations found
───────────────────────────────────────

     ██╗     ███████╗██╗ ██████╗
     ██║     ██╔════╝██║██╔═══██╗
     ██║     ███████╗██║██║   ██║
     ██║     ╚════██║██║██║   ██║
     ███████╗███████║██║╚██████╔╝
     ╚══════╝╚══════╝╚═╝ ╚═════╝

  Brought to you by linuxserver.io
───────────────────────────────────────

To support LSIO projects visit:
https://www.linuxserver.io/donate/

───────────────────────────────────────
GID/UID
───────────────────────────────────────

User UID:    501
User GID:    20
───────────────────────────────────────
Linuxserver.io version: 4.6.7-r0-ls352
Build-date: 2024-09-22T06:52:38+00:00
───────────────────────────────────────

[custom-init] No custom files found, skipping...
QtSingleCoreApplication: listen on local socket failed, QLocalServer::listen: Unknown error 22
WebUI will be started shortly after internal preparations. Please wait...

******** Information ********
To control qBittorrent, access the WebUI at: http://localhost:8099

The WebUI administrator username is: admin
The WebUI administrator password was not set. A temporary password is provided for this session: d8pa9DqsA
You should set your own password in program preferences.
Connection to localhost (127.0.0.1) 8099 port [tcp/*] succeeded!
[ls.io-init] done.
|
Docker安装 Transmission
依然参考一手教程
https://github.com/linuxserver/docker-transmission
 1
 2
 3
 4
 5
 6
 7
 8
 9
10
11
12
13
14
15
16
17
18
19
20
21
22
23
24
25
|
 **1. 在transmission目录下创建三个目录 data downloads watch** (base) ➜  transmission ll
total 8
drwxr-xr-x  2 qijian.song  staff    64B  9 26 15:14 data
-rw-r--r--  1 qijian.song  staff   641B  9 26 15:15 docker-compose.yml
drwxr-xr-x  2 qijian.song  staff    64B  9 26 15:14 downloads
drwxr-xr-x  2 qijian.song  staff    64B  9 26 15:14 watch **2. 编辑 docker-compose.yml** version: "3"
services:
 transmission:
   image: lscr.io/linuxserver/transmission:latest
   container_name: transmission
   environment:
     - PUID=501
     - PGID=20
     - TZ=Asia/Shanghai
     - USER=admin #optional
     - PASS=admin #optional
   volumes:
     - /Users/qijian.song/transmission/data:/config
     - /Users/qijian.song/transmission/downloads:/downloads
     - /Users/qijian.song/transmission/watch:/watch
   ports:
     - 9091:9091
     - 51413:51413
     - 51413:51413/udp
   restart: unless-stopped
|
想要更好看的UI可以用这个,我没安装,哈哈哈
https://flood.js.org/
如何设置查看PUID和PGID
1
2
3
4
5
6
7
|
// 查看docker进程用户名,可以看到我的用户名是root
ubuntu@VM-16-17-ubuntu:~$ ps aux|grep dockerd
ubuntu   3836248  0.0  0.0   6612  2248 pts/0

// PUID是用户ID(uid=),PGID是组ID(gid=)
ubuntu@VM-16-17-ubuntu:~$ id ubuntu
uid=1000(ubuntu) gid=1000(ubuntu) groups=1000(ubuntu)
|
Jellyfin开启硬解码


